Sometimes you just want one specific node gone.
⚠️ Anti-Pattern Alert!
Yes, in theory nodes are cattle, not pets. But in real environments—especially in enterprise setups—you don’t always have that luxury. Maybe a node is flaky, maybe it’s tied to something broken, or maybe you just know that one needs to go.
Here’s how to do it in a Cluster API (CAPI) cluster without it coming back.
The problem
CAPI is declarative. If your cluster says “I want N nodes,” it will keep N nodes.
So if you run:
kubectl delete node <node>
that node will come back. The same happens if you delete the Machine object—CAPI will simply recreate it to match the desired state.
The trick
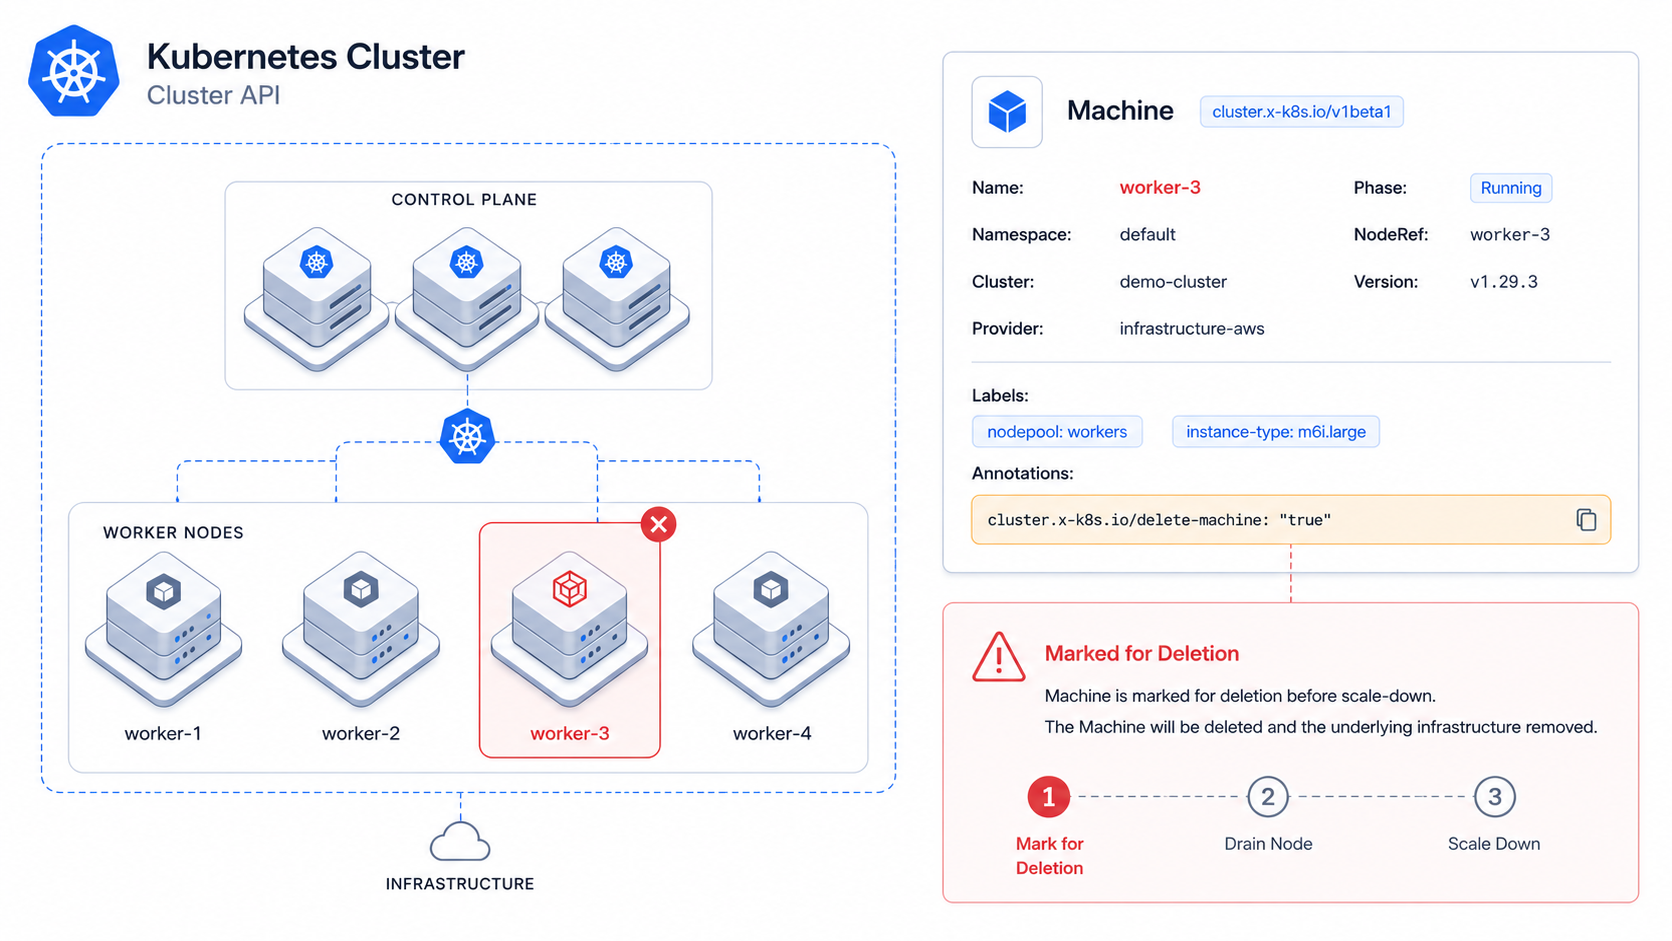
The only reliable way to control which node gets removed is to mark it before reducing capacity.
If you scale down first, CAPI will pick a Machine on its own, and at that point you’ve already lost control.
So the flow is simple:
flowchart TD
    A[Find target node] --> B[Find corresponding Machine]
    B --> C[Annotate Machine for deletion]
    C --> D{Using Cluster Autoscaler?}
    D -->|Yes| E[Update min/max size]
    D -->|No| F[Scale MachineDeployment replicas]
    E --> G[Node is removed]
    F --> G[Node is removed]
Step 1 — Find the Machine
Start by listing your nodes and picking the one you want to remove:
kubectl get nodes
Then list the Machines. You’re looking for the Machine that matches your node. The easiest way is to use:
kubectl get machines -A -o wide
This adds a NODE column, so you can match it directly with the node name:
NAMESPACE   NAME            NODE
default     worker-abc123   node-1
The NODE value should match the Kubernetes node you want to remove. If that column is empty, you can check manually:
kubectl get machine <machine-name> -n <namespace> -o yaml
and look for:
status:
  nodeRef:
    name: <node-name>
At the end of this step, you should have the Machine name and its namespace.
Step 2 — Annotate the Machine
Now mark that Machine for deletion:
kubectl annotate machine <machine-name> -n <namespace> \
  cluster.x-k8s.io/delete-machine="true"
This tells CAPI: “when you scale down, remove this one.”
Step 3 — Reduce capacity
At this point, you’ve told CAPI which Machine to remove. Now you just need to reduce the desired number of nodes so that a scale-down actually happens.
How you do that depends on whether your cluster is using the Cluster Autoscaler.
If you’re NOT using autoscaler
First, find your MachineDeployment:
kubectl get machinedeployments -A
Then scale it down:
kubectl scale machinedeployment <md-name> -n <namespace> --replicas=<new-count>
If you ARE using autoscaler
In this case, you don’t scale replicas directly because the autoscaler controls the node count.
If you’re not sure whether autoscaler is enabled, you can check quickly:
kubectl get machinedeployment <md-name> -n <namespace> -o yaml | grep autoscaler
If you see annotations like:
cluster.x-k8s.io/cluster-api-autoscaler-node-group-min-size
cluster.x-k8s.io/cluster-api-autoscaler-node-group-max-size
then autoscaler is managing your nodes. This is common on platforms like Nutanix Kubernetes Platform.
Instead of scaling replicas, update those limits:
kubectl annotate machinedeployment <md-name> -n <namespace> \
  cluster.x-k8s.io/cluster-api-autoscaler-node-group-min-size="<new-min>" \
  cluster.x-k8s.io/cluster-api-autoscaler-node-group-max-size="<new-max>" \
  --overwrite
Once the autoscaler decides to scale down, it will pick the Machine you annotated.
Verify
Finally, check that the node is gone and not replaced:
kubectl get machines -A
kubectl get nodes
TL;DR
flowchart LR
    A[Find the Machine] --> B[[Annotate it]]
B --> C[Then reduce capacity]- No autoscaler → scale the MachineDeployment
- Autoscaler → update min/max instead
If you do it in that order, CAPI will remove the node you chose—and it won’t come back.