As someone constantly building demo environments and recording videos publicly, browser certificate warnings were driving me insane. Every new cluster meant:
- Requesting certificates manually
- Copying TLS secrets around
- Checking expiration dates
Because I work a lot with ephemeral Kubernetes environments, repeating the same certificate setup process across clusters adds up quickly.
That’s where cert-manager completely changed the workflow for me. Now I keep a small set of Kubernetes manifests ready to go:
- Deploy cluster
- Configure Cloudflare token
- Apply issuer
- Request certificate
This removed the repetitive manual work of requesting, renewing, and reconfiguring certificates every time I built a new Kubernetes environment.
In my case, my demos are based in the Nutanix Kubernetes Platform (NKP) , where cert-manager is already included across Starter, Pro, and Ultimate editions, but the same setup works with any Kubernetes distribution.
cert-manager vs ExternalDNS
One of the biggest misconceptions around cert-manager is assuming it also manages your application DNS records.
It doesn’t.
cert-manager is responsible for:
- Requesting certificates from Let’s Encrypt
- Creating temporary TXT records in Cloudflare for DNS validation
- Renewing certificates automatically
You still have to manage your application DNS records separately, either manually or through automation. For the latter, I’ll be writing another blog on how ExternalDNS solves that problem.
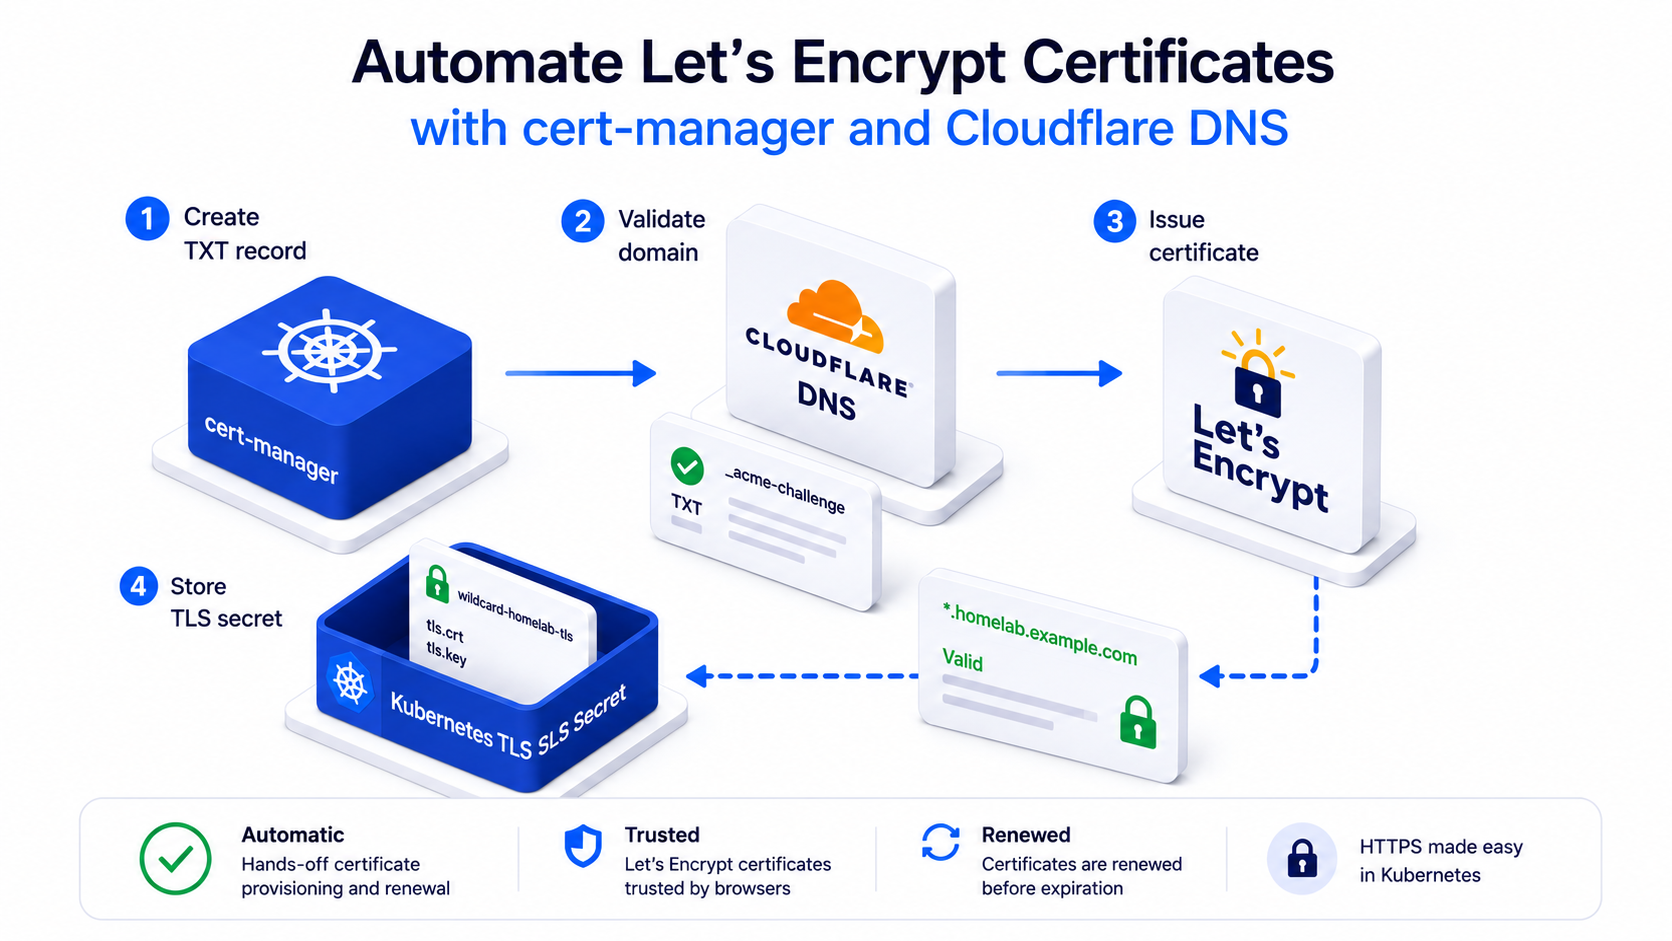
flowchart LR

    certmanager[cert-manager]
    cloudflare[Cloudflare DNS]
    letsencrypt[Let's Encrypt]
    secret[Kubernetes TLS Secret]

    certmanager -->|"1 - Create TXT record"| cloudflare
    cloudflare -->|"2 - Validate domain"| letsencrypt
    letsencrypt -->|"3 - Issue certificate"| certmanager
    certmanager -->|"4 - Store TLS secret"| secret
Verify cert-manager Exists
If you’re using NKP, cert-manager is already deployed.
Verify it exists:
kubectl get pods -n cert-manager
You should see:
cert-manager
cert-manager-cainjector
cert-manager-webhook
If you’re using another Kubernetes distribution, install cert-manager first from the upstream project.
cert-manager Installation Documentation
Create a Cloudflare API Token
In Cloudflare Dashboard :
- Go to:
- Manage account, on the left sidebar menu
- Account API tokens
- Create Token
- Use:
- DNS → Edit
Avoid using the Global API Key and scope the token only to the DNS zone(s) you actually need.
Store the Token in Kubernetes
The token must be created in the cert-manager namespace to ensure that cert-manager has access to the secret when you create the ClusterIssuer.
kubectl create secret generic cloudflare-api-token-secret \
  -n cert-manager \
  --from-literal=api-token='YOUR_CLOUDFLARE_API_TOKEN'
Create the ClusterIssuer
A ClusterIssuer is a cluster-scoped cert-manager resource that defines how certificates should be requested, which ACME server to use, and how domain validation should happen. Because it is cluster-scoped, applications and users from any namespace can later reference it when requesting certificates.
Create clusterissuer.yaml and update the value for email:
apiVersion: cert-manager.io/v1
kind: ClusterIssuer
metadata:
  name: letsencrypt-cloudflare
spec:
  acme:
    email: [email protected]

    server: https://acme-v02.api.letsencrypt.org/directory

    privateKeySecretRef:
      name: letsencrypt-cloudflare

    solvers:
    - dns01:
        cloudflare:
          apiTokenSecretRef:
            name: cloudflare-api-token-secret
            key: api-token
Note:
privateKeySecretRefis where cert-manager stores the ACME account private key used to communicate with Let’s Encrypt. This is not your application TLS certificate secret.
Apply it:
kubectl apply -f clusterissuer.yaml
Verify it becomes ready:
kubectl get clusterissuer
Request a Certificate
At this point you have two common options. You can request a wildcard certificate and reuse it across multiple apps, or you can request a dedicated certificate per FQDN.
For homelabs and demo environments, I usually prefer the wildcard approach because it reduces the number of certificates I need to manage.
apiVersion: cert-manager.io/v1
kind: Certificate
metadata:
  name: wildcard-homelab
  namespace: cert-manager
spec:
  secretName: wildcard-homelab-tls

  issuerRef:
    name: letsencrypt-cloudflare
    kind: ClusterIssuer

  dnsNames:
  - "*.homelab.example.com"
This stores the wildcard TLS secret, wildcard-homelab-tls, in the cert-manager namespace. That can make sense if you treat it as shared platform infrastructure and want to reuse it across multiple applications or namespaces.
The other option is to request a certificate directly in the application namespace:
apiVersion: cert-manager.io/v1
kind: Certificate
metadata:
  name: demo-app
  namespace: demo
spec:
  secretName: demo-app-tls

  issuerRef:
    name: letsencrypt-cloudflare
    kind: ClusterIssuer

  dnsNames:
  - demo.homelab.example.com
This creates the TLS secret demo-app-tls in the same namespace as the app, which is usually cleaner for application-specific certificates because the Ingress or Gateway can reference the secret locally.
Verify the TLS Secret
Watch the certificate:
kubectl get certificate -A -w
The full process usually takes around a minute while cert-manager creates the temporary TXT record in Cloudflare, waits for DNS propagation, and Let’s Encrypt verifies the challenge before issuing the certificate.
Then verify the generated secret exists in the namespace where the Certificate resource was created:
kubectl get secret -n cert-manager
Or for an application-specific certificate:
kubectl get secret -n demo
You should see your generated TLS secret:
wildcard-homelab-tls
or:
demo-app-tls
At this point:
- cert-manager requested the certificate
- Cloudflare handled DNS validation
- Let’s Encrypt issued the certificate
- Kubernetes stored it as a TLS secret in the target namespace
What I Learned
cert-manager can automatically generate and renew trusted Let’s Encrypt certificates directly from Kubernetes using DNS validation.
In this example I used Cloudflare , but cert-manager supports many other DNS providers as well. You can check the supported providers in the cert-manager documentation: https://cert-manager.io/docs/configuration/acme/dns01/
For me, this removed one of the most repetitive parts of rebuilding Kubernetes demo and lab environments:
- manually requesting certificates
- dealing with browser warnings
- repeating the same TLS setup process on every new cluster
Now it’s just:
- apply manifests
- wait for the TLS secret
- use HTTPS
In the next post, we’ll automate the other half of the workflow: Creating DNS records automatically with ExternalDNS in Kubernetes.